
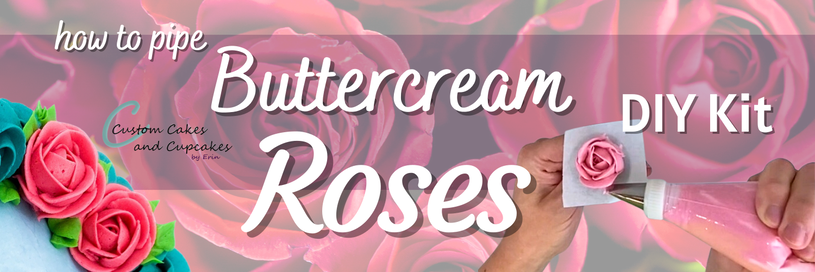
How to Pipe
|
|
|
|

|
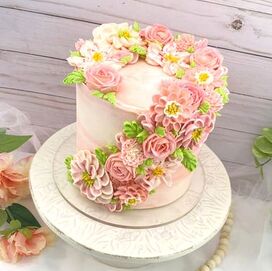
Piping buttercream roses is a very useful skill to build and adds a beautiful floral touch to cakes, cookies, cupcakes, and more.
Here is everything you need to know about piping buttercream roses!
Here is everything you need to know about piping buttercream roses!
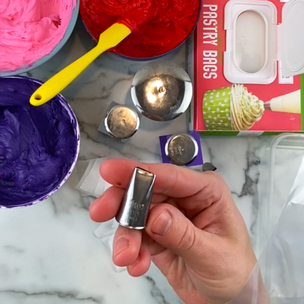
What You Need
|
Find links for supplies and materials at the bottom of this page
Buttercream frosting (find all my recipes HERE), or use your own preferred recipe 103 or 104 petal piping tip (or any size petal tip of your choice) Piping bags Gel coloring, if desired Parchment paper, cut into 1-2" squares Flower nail(s) Flower Nail Buddy stand Plate, cutting board, or other flat freezer-safe container Scissors A prepared dessert - cake, cupcakes, cookies, or other - that you wish to decorated with buttercream roses Click here for my Buttercream Roses DIY Kit! |
|
Step 1: Making Buttercream Frosting
|
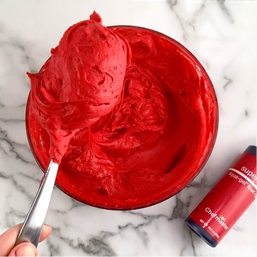
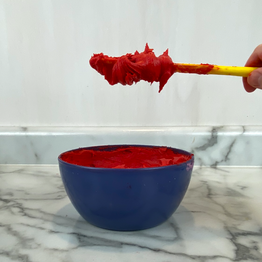
Mix your favorite buttercream frosting (find all my recipes HERE) in a stand or hand mixer on low to medium speed, or use prepackaged frosting.
Add a couple of tablespoons of powdered sugar to the buttercream to stiffen the consistency for piping and mix this well on lowest mixer speed. A good way to test for a stiff consistency buttercream is to scoop some up with a spoon, turn the spoon upside down, and if the buttercream doesn't fall off the spoon, it is thickened enough. If it falls off the spoon, mix in some more powdered sugar. Color the buttercream with gel coloring, if desired. Make sure to use a gel-based coloring rather than a water-based coloring, so this doesn't thin out and water down the buttercream. Color will deepen with time, so buttercream may be made a day or two in advance and stored in the refrigerator in an airtight container. If refrigerating, allow buttercream to warm up a bit at room temperature before using to make piping easier. Keep covered until ready to use. Stir well just prior to using to press out air bubbles. |
|
Step 2: Preparing to Pipe
|
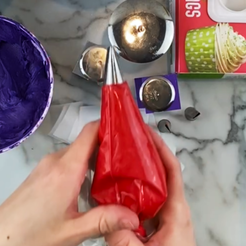
Place tip 103 or 104 (or your desired petal tip) into a piping bag and cut off the tip of the bag, so the piping tip sticks through it, but stays in place.
Using a spoon or spatula, add the buttercream to the piping bag. Cut several 1"-2" squares of parchment paper to use on the flower nail. Have a plate, cutting board, or other flat freezer-safe dish or container ready. |
|
Step 3: Piping a Rose
|
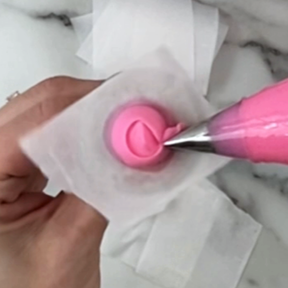
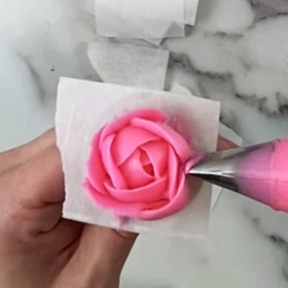
Hold the piping bag in your dominant hand and hold the flower nail in your nondominant hand. Pipe a dot of buttercream onto the flower nail to hold a parchment square in place.
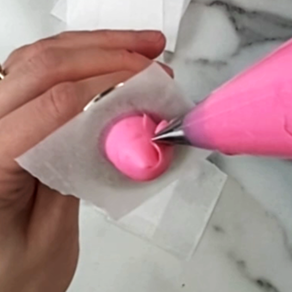
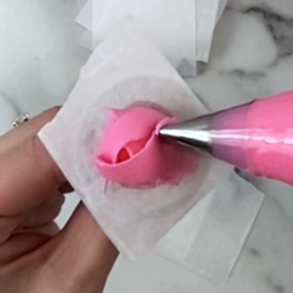
Squeeze the piping bag to pipe a blob of buttercream onto the center of the parchment, then pipe a ring around this. Keeping the narrow end of the piping tip upward and the wide end downward, pipe a cone on top of this, resembling a rosebud to start from (see video). Make sure to hold the bag so that the narrow end of the piping tip is up and the wide end is down when piping petals. Pipe an arc-shaped petal, overlapping the cone, and release pressure fully. Pipe two more petals at this height, overlapping one another. See video. Begin the next row of petals just as described in the previous step, keeping the narrow end of the tip up, overlapping one another. Pipe 5 petals in this row. Continue to pipe petals in this manner until the rose is as full as desired. Aim for an odd number of petals in each row, as this is how roses are typically found in nature. Start with 3 petals in the first row, then 5 petals in the second row, then 7, and so on. |
|
|
Step 4: Freezing the Roses
|
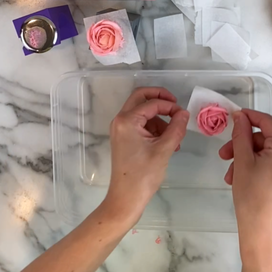
After piping each rose, carefully lift the parchment square from the flower nail and place it on a plate, cutting board, or other freezer-safe container or dish.
Freeze the roses for 20 minutes or until firm to the touch. |
|
Step 5: Decorating with the Roses
|
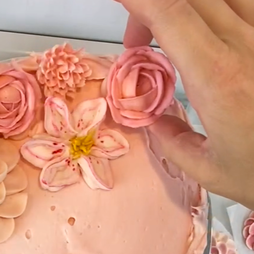
Have your dessert or treat ready before removing the roses from the freezer. Handle the roses quickly, as they will melt from the warmth of your hands.
Pipe a little buttercream where desired and add each rose on top. |
|
Alternate Method
|
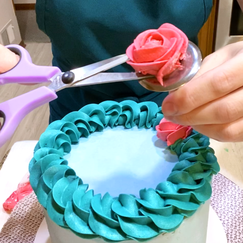
Rather than freezing, a rose can be piped directly onto the flower nail without a parchment square, then lifted directly onto a dessert using a small scissors or flower lifter. See video.
|
|
Supplies and Materials Links
Recipes for buttercream frostings
Gel colorings: Chefmaster Liqua-gels or Americolor Gel-pastes: Amazon Storefront
Piping bags: various brands: Amazon Storefront
103, 104, other piping tips and flower nails: Ateco or Wilton: Amazon Storefront
Flower Nail Buddy stand: Custom Cutters and Embossers: custombakingbyerin.com
Gel colorings: Chefmaster Liqua-gels or Americolor Gel-pastes: Amazon Storefront
Piping bags: various brands: Amazon Storefront
103, 104, other piping tips and flower nails: Ateco or Wilton: Amazon Storefront
Flower Nail Buddy stand: Custom Cutters and Embossers: custombakingbyerin.com

|
I would love to see your buttercream roses!
Tag me @erin.cakesandcupcakes on Instagram, TikTok, or Facebook!
|
|

Note: purchases made from links on this page may result in my earning a commission.