
|
|

|
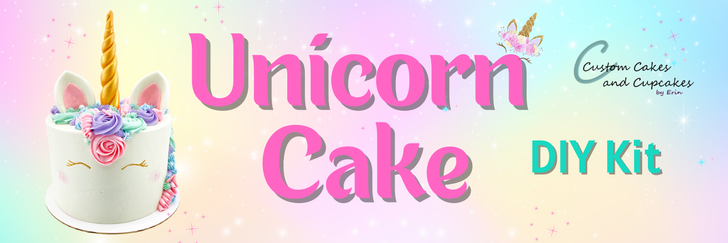
How to make a
|
|
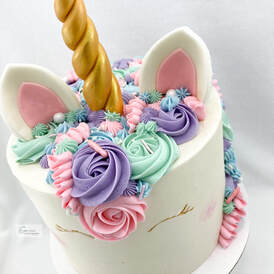
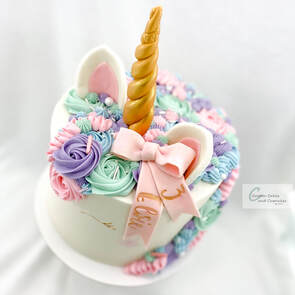
This is such a popular cake design for a unicorn party!
Although it is a common theme, there are many ways to be creative with this design by using different color schemes, added decor, or personalization.
Although it is a common theme, there are many ways to be creative with this design by using different color schemes, added decor, or personalization.
What You Need
Find links for supplies and materials at the bottom of this page
Fondant (find my recipe HERE, or any type will work)
Rolling pin
Cornstarch
Unicorn Eyes and Ears Embossers and Cutters Set (or circle cutters and a toothpick)
Gel coloring: pink, yellow, brown, green, blue, purple if desired
Round container or bottle
Toothpicks/skewers
Edible gold paint or gold luster dust and an alcohol/clear extract
Small brushes
Cake and buttercream frosting recipes (find my recipes HERE) or mixes
Cake pans 8", 6", or 5" sizes
Cake decorating turntable
Offset spatula
Cake smoother/scraper
Piping bags
Piping tips: 1M, 103 or other petal tip, 199 or other small open star tip
Click here for my Unicorn Cake DIY Kit!
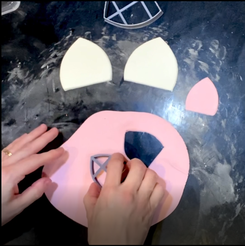
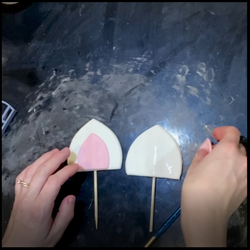
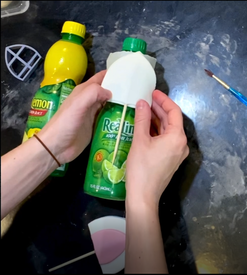
Step 1: Making the Fondant Ears
|
Click HERE for my homemade MARSHMALLOW FONDANT recipe and tutorial to make your own fondant, or use store bought or your own favorite recipe.
NOTE: make the ears at least a day or two in advance, as they will require drying time. Using gel-based coloring, color a small piece of fondant light pink (or use pre-colored pink fondant), and set aside another piece to be left white. Dust your surface with cornstarch to prevent fondant sticking. Roll out the white fondant and use the larger ear cutter to make two triangular ear shapes, as shown in the video (link for this set below). You can also use a circle cutter to to make this shape instead. Roll out the pink fondant and use the smaller ear cutter to make 2 smaller versions of this rounded triangle shape. Brush the white shapes with water and press a toothpick about halfway into the ear (see video). Add the pink ear linings on top. The water will allow these to stick together. Find a rounded bottle, can, cup, or other object and wrap this in parchment paper to prevent the fondant from sticking to it. Gently wrap each ear around the object to allow to dry in this position overnight. |
|
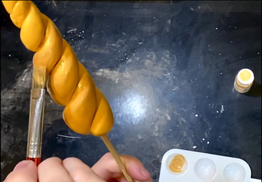
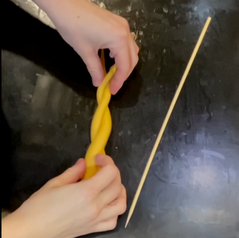
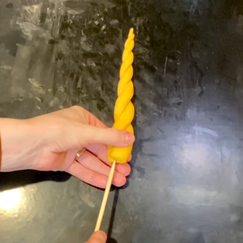
Step 2: Making the Fondant Horn
|
NOTE: make the horn at least a day or two in advance, as this will require drying time.
Color a piece of fondant with a drop or 2 of yellow gel coloring and a tiny bit of brown to create a gold color (or use pre-colored gold or yellow fondant). We will paint this metallic gold later. Divide this fondant piece in half and roll out two long tapered snakes or ropes. Spiral these around one another, and brush water into the seams (see video). Cut off at desired length. Dip a skewer or lollipop stick into water, and carefully insert this through the horn – this may take some time, and it helps to turn the stick a bit as you press this in. Roll this entire piece lightly and gently to reshape as needed. Insert this into a foam block, or a small box with a hole cut into it to anchor the horn and hold it upright. Using an edible gold paint (or a mixture of gold luster/sparkle dust and vodka or other clear alcohol or extract), paint the horn with a brush until it is covered in metallic gold. You can also brush luster dust on the horn dry as well to get a similar effect. Allow this to dry overnight. |
|
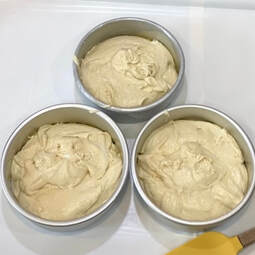
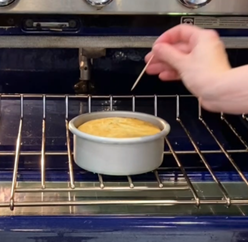
Step 3: Baking the Cake Layers
|
Mix your favorite cake recipe (find all my recipes HERE) or a boxed cake mix if desired.
NOTE: it is helpful to bake cake layers ahead of time and freeze them until ready to decorate. Decide which flavor(s) and size to bake. This design works well on any cake size. My recipes can be found HERE, or you can use a preferred recipe, a boxed cake mix, or purchase a cake from a grocery store to decorate and skip this step. I've found that unicorn face cakes look most proportional as a 2-layer 6" cake, a 2-layer 5" cake, a 3-layer 8" cake, or a 3-layer 9" cake. Very short or very tall cakes will have a different look. Sizing is of course entirely your choice, however. Optional – place parchment circles into cake pans for easier release. You can also cut circles out of rolled parchment paper. Spray sides of cake pans with nonstick cooking spray/canola spray. Fill your cake pans approximately 1/2 to 2/3 full with batter. Bake layers as directed by your recipe or mix package, 1 or 2 cake layers at a time. Layers will be done once a toothpick comes out clean from the center, so timing will vary. Allow to cool completely before decorating. Run a knife around the edge of the pan to allow the layer to release easier. Wrap in tightly in plastic wrap and store in freezer in airtight bag or container until ready to decorate |
|
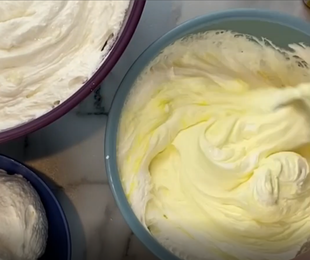
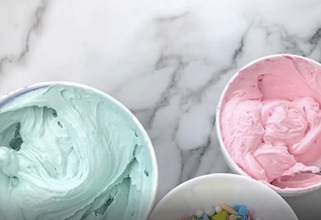
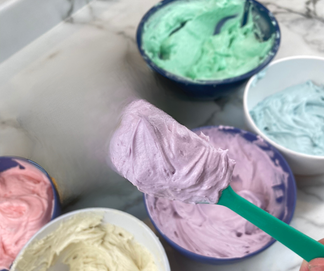
Step 4: Mixing the Buttercream Frosting
|
Follow your favorite buttercream frosting recipe (find all my recipes HERE) or use prepackaged frosting if desired.
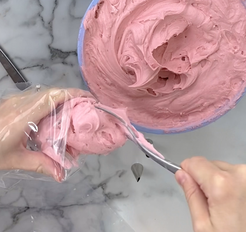
NOTE: buttercream frosting can be made a day or two ahead of time and stored in airtight containers in the fridge. Divide buttercream into 5 bowls: 1 large bowl, and 4 small bowls. Color as follows: White: large bowl: leave white, no added coloring. Pink: small bowl: 1-2 drops pink gel coloring. Purple: small bowl: 1 drop purple or violet gel (or 1-2 drops pink + 1 drop blue). Blue: small bowl: 1 drop blue gel. May also add 1 drop purple/violet gel if desired. Teal: small bowl: 1 drop teal gel (or 1 drop blue + 1 drop green). These instructions are for a pastel color scheme, so if you’d like more vibrant colors, add more gel coloring if desired. Colors will deepen with time, so the buttercream may be made a day or two in advance and stored in the refrigerator in an airtight container. Add a tablespoon of powdered sugar to each of the smaller bowls with colored frosting to stiffen the consistency of the buttercream for piping. Add 2 teaspoons of your recipe's liquid source (cream, water, milk, etc) to the white buttercream to thin it slightly for easier frosting and spreading. If refrigerating, allow buttercream to warm up to room temperature (this may take a few hours) before using to make piping easier. Keep covered until ready to use. Stir well just prior to using to press out air bubbles. |
|
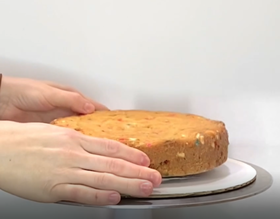
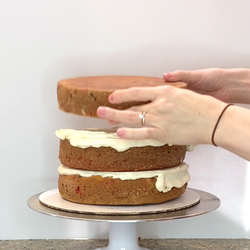
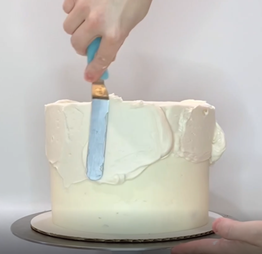
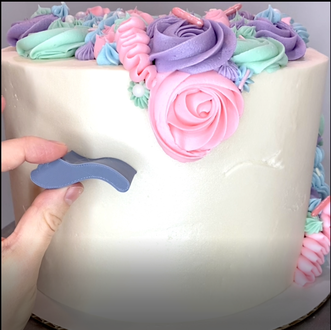
Step 5: Stacking and Crumb Coating the Cake
|
Using an offset spatula, spread a little of the white buttercream onto the cake board and place the first layer down.
Spread more of the white buttercream onto the first layer, and then add the second cake layer. Repeat this on the second layer and place the third layer upside down on top (placing the top layer upside down gives a sharper edge to the top of the cake). If you are making a 2-layer cake, the second layer would be added upside down. Spread the buttercream over top of the cake with spatula, continuing with sides of cake as shown in video. Once the cake is covered, use a cake scraper to smooth the sides (see video), leaving a thin coat of buttercream. This may take several passes. Use your offset spatula to pull the extra buttercream on top in toward the center to create a sharp edge. Chill the cake in the refrigerator for 20-30 minutes or until the buttercream is set and firm to the touch. |
|
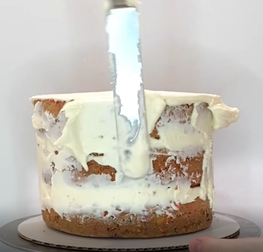
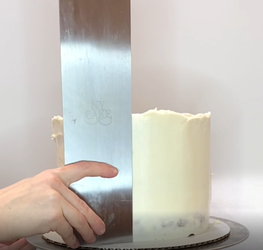
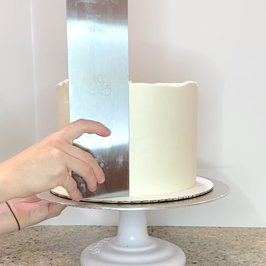
Step 6: Frosting the Final Coat
|
Spread a generous amount of white buttercream over the top of the cake and continue spreading over the sides, keeping the spatula straight against the sides as shown in the video.
Smooth the buttercream with your scraper. It is helpful to warm up the metal under hot water (wipe dry) to soften and smooth the buttercream. This may take several passes. Create the top edge by lightly pulling off extra buttercream in toward the center with your offset spatula just like when crumb coating. Think about working this parallel to the top of your cake, and not at an angle. Optional - spray with pearl edible shimmer spray after adding final coat. Chill the cake in the refrigerator for 20-30 minutes or until the buttercream is set and firm to the touch. |
|
Step 7: Preparing to Decorate
|
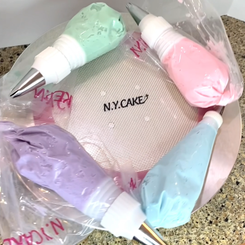
I used 1M tips to pipe the rosette swirls on the unicorn's mane. You can use multiple 1M tips, a combination of 1M and 2D tips, or really any large open star piping tips you like. When using just 1 tip, large couplers can be used to use the same tip for multiple bags, or you can use your piping tip for 1 color, then remove it, wash, and use it with another color. To use couplers, unscrew/remove the rings from each of the large couplers and place each into a piping bag. Cut the ends of the bags off, so that the coupler sticks through slightly, but stays in place. Fill each bag with one of the four buttercream colors: pink, blue, teal, and purple. Add the tip and secure by screwing the coupler ring back on.
I used small open star tips (199, 18, 32, 21, etc) to pipe drop stars and shells, and petal tips (102, 103, 104) to pipe ribbons and ruffles on the unicorn's mane. Any combination of these tips will achieve a similar effect. Again, to share a tip across multiple bags/colors, small couplers can be used for these. Unscrew/remove the rings from each of the small couplers and place each into a piping bag. Cut the ends of the bags off, so that the coupler sticks through slightly, but stays in place. Fill each bag with one of the four buttercream colors: pink, blue, teal, and purple. |
|
Step 8: Piping the Buttercream Mane
|
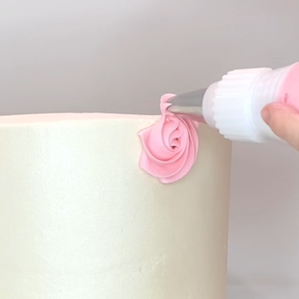
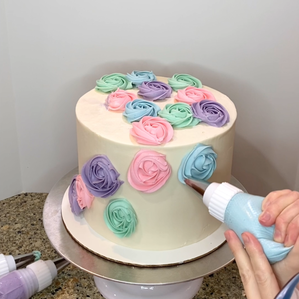
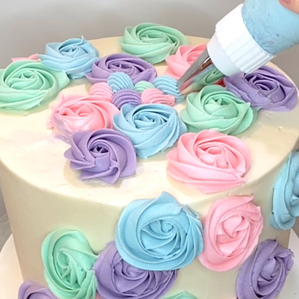
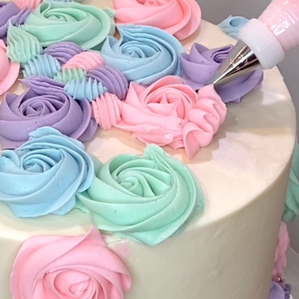
This part is where you can be most creative. I like to start with a rosette/swirl right in the center top edge of the cake (as the unicorn's front hair/bangs), and then work my way over the top and back, ending around the side a bit. Then, I'll fill in with drop stars, shells, and ribbons. Add the colors in any pattern or at random.
To pipe rosettes or swirls, hold the tip straight against the cake, perpendicular to the side or top (not at an angle). Squeeze with medium pressure in one spot to attach the buttercream to the cake and swirl around this while maintaining this pressure. Gradually release as you continue with the swirling motion to finish. Add several of these over the top of the cake and along the back (imagining a “mane” shape cascading down). If you are sharing the 1M or other open star tip among multiple colors, remove this, wash/dry, and then repeat with another color. To pipe buttercream shells, hold the bag at a 45 degree angle to the cake, squeeze with medium pressure, count to 3 to allow the shell to fill, and then releasing pressure and pulling down at an angle. Avoid rocking your hand up and down. Follow this with another shell (either of the same or another color) next to it or behind it. See video. To pipe drop stars, by holding the piping bag perpendicular to the cake, squeeze with medium pressure, then release fully before pulling away (this resembles a chocolate kiss). Repeat this with other colors as desired. To pipe ribbons, by hold the bag so the wide end of the tip is against the cake, and the narrow end is up. Squeeze with medium to light pressure and wiggle the piping bag back and forth to create a ribbon (see video). Release pressure entirely before pulling away. Continue with other colors as desired. |
|
Step 9: Painting the Eyes
|
Make sure the cake has been chilled well prior to this step. You may wish to place it back into the fridge after piping for a bit.
Using the unicorn eye embossing stamps, press each one into the cold, set buttercream to create an embossed guide for painting. The link for this product is below. You may also use a toothpick to just draw eyes/lashes/etc instead of using the stamps. Using the gold edible paint (or a mixture of gold luster or sparkle dust with vodka, or other clear alcohol or extract), paint in the indentations left by the stamps or toothpick with a very fine brush. I used gold to match the unicorn's horn, but you can certainly use black or other colors as well. |
|

|
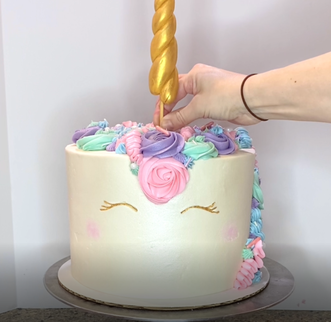
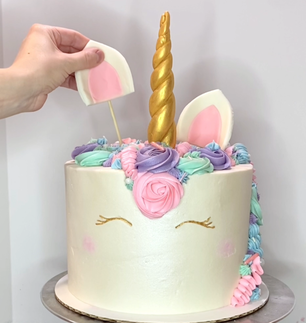
Step 10: Adding the Horn, Ears, and Sprinkles
|
Insert the horn into the top of the cake, centered, but near the front. If this is difficult with the cake being cold, a pliers can help to carefully finish inserting the horn. I like to insert this at a slight forward angle.
Add the ears on either side of the horn. If any of the mane piping was bumped while inserting the horn or ears, pipe more rosettes, ribbons, drop stars, or shells around the insertion site to hide it. Optional ideas: add sprinkles, small candies, or dust edible glitter over the unicorn's mane for added sparkle. Creating a fondant bow and ribbon to add personalization is another fun addition shown in the video. |
|
|
Supplies and Materials Links:
Unicorn Ears and Eyes Cutters and Embossers Set: Custom Cutters and Embossers: custombakingbyerin.com
Homemade DIY Marshmallow Fondant Recipe
Recipes for cake batters and buttercream frostings
Edible gold paint: Sweet Sticks: Amazon Storefront
Gel coloring: Chefmaster liqua-gels and Americolor gel-pastes: Amazon Storefront
Cake pans, offset spatulas, angled spatulas, scrapers, turntable, and brushes: NY Cake, Ateco, Wilton, various brands: Amazon Storefront
Piping bags, piping tips, and couplers: Wilton, Ateco, NY Cake, various brands: Amazon Storefront
Parchment circles and cake boards: Wilton and various brands: Amazon Storefront
Sprinkles and sprinkle mixes: Sweets & Treats, SprinklePop, SimpleSucre, and more: Amazon Storefront
|
I would love to see your unicorn cakes!
Tag me @erin.cakesandcupcakes on Instagram, TikTok, and Facebook!
|
|

Note: purchases made from links on this page may result in my earning a commission.